Secure Webhooks in Jira Cloud
With Secure Admin Webhooks, users can fortify their webhook registrations, whether initiated through the REST API or the dedicated webhooks page, by leveraging the secret field. This simple yet effective mechanism adds an additional layer of protection to webhook communications, ensuring that sensitive data remains shielded from potential threats.
By incorporating a secret field into webhook registrations, Atlassian empowers users to encrypt their webhook payloads, rendering them inaccessible to unauthorized entities. This cryptographic safeguard significantly mitigates the risk of data breaches and unauthorized access, bolstering the overall security posture of the integrated systems.
Things to Note

Steps to Creating and Updating Secret Tokens for Webhooks
Integrating secure webhook functionality into your system is a crucial step in ensuring the integrity and safety of your data exchanges with Jira Cloud. Follow these simple steps to create and update secret tokens for your webhooks:
Creating a Secret Token:
- Navigate to the webhook settings in your Jira Cloud instance.
- Choose to create a new webhook or select an existing one to add a secret token.
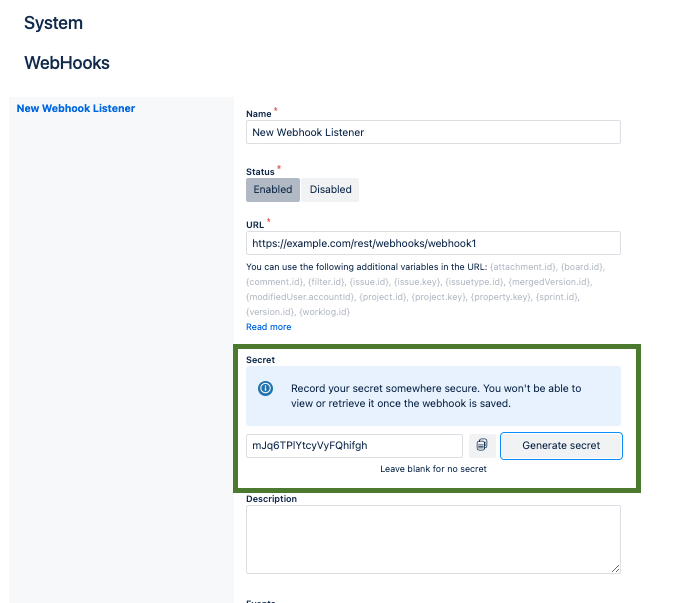
- Generate a random string of text with high entropy for your secret token. Alternatively, utilize the “Generate secret” feature provided by Jira Cloud.
- Record the secret token securely in a safe location. Once saved, it cannot be accessed or retrieved again.
Updating a Secret Token:
- Access the settings for the webhook whose secret token you wish to update.
- Edit the webhook details to make changes.
- Generate a new secret token following the same guidelines as creating a new one.
- Ensure to update all integrations using the old secret token to prevent disruption in data exchanges.
By following these steps, you can enhance the security of your webhook communications with Jira Cloud, safeguarding your valuable data from unauthorized access or tampering.
Validating Webhook Deliveries for Enhanced Security
When validating webhook payloads in your code, calculate the HMAC of the body using your secret token and hash algorithm. Compare this HMAC with the one sent by Jira Cloud to verify authenticity. Remember to handle character encoding correctly, especially UTF-8, to accommodate Unicode characters in webhook payloads. Key notes to remember as follows
- Jira Cloud uses a secret token to create an HMAC signature for webhook deliveries.
- The HMAC signature is included in the X-Hub-Signature header in the format method=signature, as specified by WebSub
- In your code handling webhook deliveries, you need to compute the HMAC of the body using your secret token and the specified hash algorithm.
- Compare the HMAC sent by Jira Cloud with the expected HMAC calculated in your code to ensure they match, this is an imporant step in validating the authenticity of the payload.
- The HMAC is generated using the webhook’s secret token, payload contents, and the hash algorithm listed in the method.
- Ensure proper handling of character encoding, especially UTF-8, as webhook payloads can contain Unicode characters.
If you found this useful check out this article from Atlassian too!
Thanks for visiting, click here to learn more about out our Atlassian Cloud Services!
