
Reduce Jira Noise
Types of Notifications in Jira
Before diving in, it’s essential to familiarize ourselves with the Types of Notifications in Jira. Here’s a rundown of the most frequently encountered notifications and their significance.
Issue updates:
These are triggered when certain events occur on an issue, like creation, updates, or deletion. You’ll get notified if you are the issue reporter, assignee, or watcher.
Mentions:
If someone mentions you in a comment or issue description using “@username”, you’ll receive a direct notification. This is particularly useful for drawing your attention to specific issues or comments.
Project:
These notifications are related to the overall project events like version releases, project updates, or user role changes.
Sprint:
In an agile setting, you’ll get updates regarding sprint activities, including the start of a new sprint, sprint closures, or updates to the sprint goal.
Bulk:
These are sent out when multiple issues are edited, transitioned, or commented on at once. It’s a collective notification for batch actions.
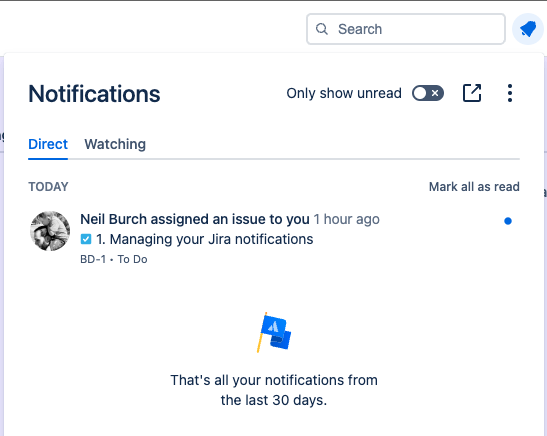
These represent just a few of the primary notifications delivered through Jira. When you receive a notification, an alert will appear at the top of your page. Selecting the notification will display a concise summary detailing the reason for the alert.

Manage your Jira personal settings
To manage your Jira personal settings, navigate to your profile and access the settings or preferences section. Here you can adjust various options, including notification preferences, to tailor your Jira experience. Customize how and when you receive alerts, manage your email settings, and update your profile information to ensure a personalized and efficient workflow. Regularly reviewing and updating these settings will help you stay organized and focused on your tasks.
Bonus Tip!
You can access the same page by adding “/secure/ViewPersonalSettings.jspa” after you personal sites URL.
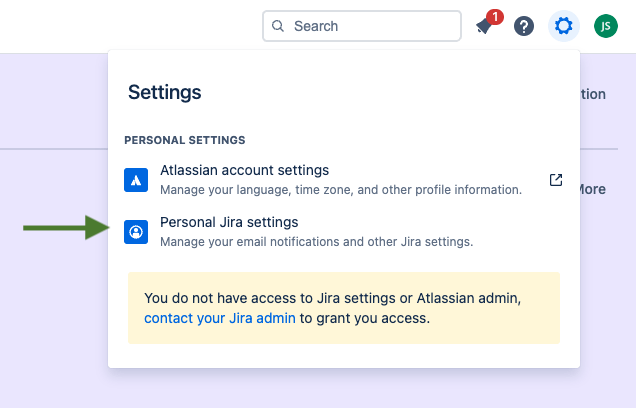

Navigate to your Personal Jira Settings by clicking the Cog icon located at the top of your page. Once on the Personal Settings page, locate the Notifications section, as illustrated in the adjacent image. In this section, you can customize your notification preferences to select the types of alerts you wish to receive.
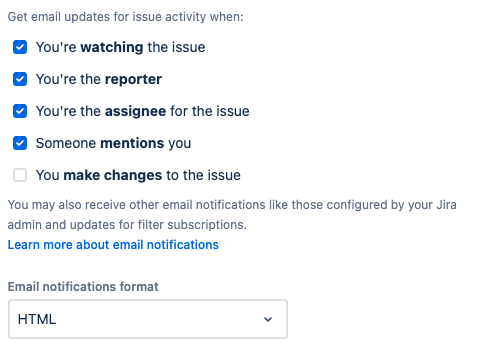
The default settings in Jira are established by your admin and can vary with each project. Typically, you might receive notices for actions like comments being added or work log entries being completed on an issue. To streamline your inbox, Jira groups these individual modifications into a single summary email instead of sending separate emails for every small change.
Although Jira comes with predefined default email settings, you’re empowered to tailor some settings to reduce the influx of emails by checking and unchecking the notification boxes in the settings. Additionally, beyond these customizable options, you might also receive emails to the following.
- Announcements or updates pertinent to your Jira site.
- Notifications stemming from issue filter subscriptions you’ve established.
- Alerts concerning activities external to Jira, which may include updates regarding your Atlassian account.
Bonus Tip!
To streamline your Jira interactions, consider disabling the option that alerts you every time you make changes to issues. Specifically, uncheck the “Notify me of my changes” setting. It’s generally a good practice to have this turned off by default to avoid redundant alerts on actions you are already aware of, thereby reducing unnecessary clutter. This simple adjustment can make your workflow more efficient and is a recommended tweak for all users.
Best Practices
Notifications in Jira are meant to streamline your workflow, not hinder it. To ensure they serve their purpose without becoming a source of distraction, consider these quick best practices for managing your project notifications effectively.
Regularly Update Preferences: As your role or project evolves, so should your notification settings. Regularly review and adjust them to ensure relevance and reduce clutter.
Customize Notification Schemes: Work with your Jira admin to tailor notification schemes that fit the needs of your team and project.
Unsubscribe from Unnecessary Notifications: Keep your inbox manageable by unsubscribing from any notifications that aren’t useful to you.
Encourage Proper Use Among Team Members: Promote a culture of effective communication by educating your team on the best practices for using notifications.
Understand Project Roles and Permissions: Knowing who needs what information will help you set up more effective notification paths.
Disable Notifications for Bulk Changes When Appropriate: If you’re making a lot of changes at once, consider temporarily disabling notifications to avoid flooding others’ inboxes.
Wrapping Up:
This is just the tip of the iceberg for Jira’s notification system. The mechanisms built in the Jira software is an invaluable tool for staying current with project updates, but it goes to say it demands proper management. By understanding the available features and effectively utilizing customization tools, you can tailor Jira’s system to your advantage, ensuring that you and your team are informed, not overwhelmed. Take these insights back to your project, implement them, and watch as your team becomes more efficiently aligned with crucial updates.
If you found this useful check out this article from Atlassian too!
Thanks for visiting, click here to learn more about out our Atlassian Cloud Services!